Introduction to Linux
by Mikhail Berkov, Alexander Berkov
Introduction
Acknowledgments
Number Systems and Character Encodings
In this chapter, we will dive into the fundamental concepts of number systems and character encodings — a crucial foundation for everything you will encounter in the world of computers.
Number Systems
Digits and Bases
You may already know that there are various number systems, and the same number can be represented differently in each one.
The most common number system is the decimal (base-10) system, which humans typically use to represent numbers.
However, computers cannot represent such a wide range of digits because they are typically designed with circuitry that operates in two states: on (1) or off (0). Therefore, computers represent numbers using the binary (base-2) number system internally. Additionally, a lot of times (especially when dealing with cryptography and networking) we need the hexadecimal (base-16) number system. Therefore, understanding how number systems work in general is crucial.
Different number systems are distinguished by the digits they use. Digits are the individual units that you can use to "create" a number.
The base of a number system is the number of digits available in it.
For example, the decimal system has the digits 0, 1, 2, 3, 4, 5, 6, 7, 8, 9.
Therefore, the base of the decimal system is 10.
The binary system has only 2 digits, namely 0 and 1.
Therefore, the base of the binary system is 2.
The hexadecimal system has base 16. This leads to a problem - after all, we only have 10 "conventional digits" (0-9).
The solution to this is simple - we use the letters A-F for the last digits.
The digits of the hexadecimal system are therefore 0, 1, 2, 3, 4, 5, 6, 7, 8, 9, A (for 10), B (for 11), C (for 12), D (for 13), E (for 14), F (for 15).
Creating Numbers
How do we create a number in a number system?
Consider the number 7423 in the decimal system.
In high school, you probably learned that each digit has a "place value".
For example, the digit 3 is in the ones position and therefore has the place value 3.
The digit 2 is in the tens position and, therefore, has the place value 2 * 10, i.e. 20.
The digit 4 is in the hundreds position and, therefore, has the place value 4 * 100, i.e. 400.
Finally, the digit 7 is in the thousands position and, therefore, has the place value 7 * 1000, i.e. 7000.
The "value" of the number 7423 is then the sum of all the place values of the digits, i.e.
3 + 20 + 400 + 7000 = 7423
In the decimal system, you do not actually need to laboriously compute the value of the number to get it - you can simply look at the number itself.
However, in the binary system, it is different.
Consider the number 1101 in the binary system.
Here, each digit also has a position, but the place values are computed differently.
The multipliers are no longer powers of ten (i.e. 1, 10, 100 and 1000), but powers of two (i.e. 1, 2, 4 and 8).
In our example, we have a digit 1 in the ones position - it has the place value 1.
The digit 0 is in the "twos" position and, therefore, has the place value 0 * 2, i.e. 0.
The next digit 1 is in the "fours" position and, therefore, has the place value 1 * 4, i.e. 4.
Finally, the digit 1 is in the "eights" position and, therefore, has the place value 1 * 8, i.e. 8.
Therefore, the value of the number 1101 would be:
1 + 4 + 8 = 13
How could we approach this for an arbitrary number and number system?
Looking at our examples, we see that the value of a number is the sum of its place values:
V = p_0 + p_1 + ... + p_n
where p_i is the place value of the ith digit.
Each place value is computed by multiplying the digit with the corresponding multiplier. It is easy to see that the multiplier is simply the base raised to the power of the position of the digit.
Therefore, you can calculate the value of a number in any given number system via the following formula:
V = d_0 * b^0 + d_1 * b^1 + ... + d_n * b^n
In this formula:
Vrepresents the value of the numbernis the number of digits in the number (for example the number7423has 4 digits)d_iis the digit in the i-th position from the right (0-indexed), for example given the number7423,d_1would be2andd_2would be4bis the base of the number system
Let's apply this formula to our examples.
First, we will calculate the value of 7423 in base 10.
Here, we have n = 4 (since we have 4 digits).
The digits are d_0 = 3, d_1 = 2, d_2 = 4 and d_3 = 7.
And since the base is b = 10, the multipliers will be b^0 = 10^0 = 1, b^1 = 10^1 = 10, b^2 = 10^2 = 100 and b^3 = 10^3 = 1000, respectively.
Therefore, we get:
V = d_0 * b^0 + d_1 * b^1 + d_2 * b^2 + d_3 * b^3 = 3 * 1 + 2 * 10 + 4 * 100 + 7 * 1000 = 7423
Second, let's calculate the value of 1101 in base 2.
Here, we have n = 4 (since we have 4 digits).
The digits are d_0 = 1, d_1 = 0, d_2 = 1 and d_3 = 1.
And since the base is b = 2, the multipliers will be b^0 = 2^0 = 1, b^1 = 2^1 = 2, b^2 = 2^2 = 4 and b^3 = 2^3 = 8, respectively.
Therefore, we get:
V = d_0 * b^0 + d_1 * b^1 + d_2 * b^2 + d_3 * b^3 = 1 * 1 + 0 * 2 + 1 * 4 + 1 * 8 = 13
As you might have already guessed the binary system is not really human readable, especially because it needs much more space than the corresponding decimal number.
Therefore, we often represent digital data using the hexadecimal system. The general formula for calculating values of hexadecimal numbers is the same as for every other number system.
Consider the number 5fa8:
V = d_0 * b^0 + d_1 * b^1 + d_2 * b^2 + d_3 * b^3 = 8 * 1 + 10 * 16 + 15 * 16^2 + 5 * 16^3 = 24488
We use the hexadecimal number system rather than the decimal system for digital data representation because the relationship between base 16 and base 2 is much more straightforward and convenient than that between base 10 and base 2.
This is because you represent the numbers 0 to 15 using either one hexadecimal digit (0 to F) or four binary digits (0000 to 1111).
This means that one byte (eight bits) can be represented using two hexadecimal numbers.
We have introduced the most common number systems:
base-10- the ones humans usebase-2- this is how computers actually represent digital database-16- a smaller and more readable representation of digital data
There are numerous other number systems, such as the base 8 system, also known as the octal system, which is occasionally used. Additionally, by applying the same method, you can construct various other systems, like base 6 or base 11. However, these systems do not have real practical applications.
Unicode
In the previous chapter, we explored how numbers used by humans are represented inside a computer and how to programmatically convert from the computer's binary representation to the decimal system, that we are all familiar with. However, you are likely reading this text not as a series of numbers, but as meaningful words. So, how do we go from numbers to text?
To bridge this gap, we need a system that assigns a unique number to each character. In the early days of computing, systems like ASCII (American Standard Code for Information Interchange) were developed, but they were limited to representing a small set of characters (mostly English letters, digits and some other things).
ASCII
Here is how an ASCII table looks:
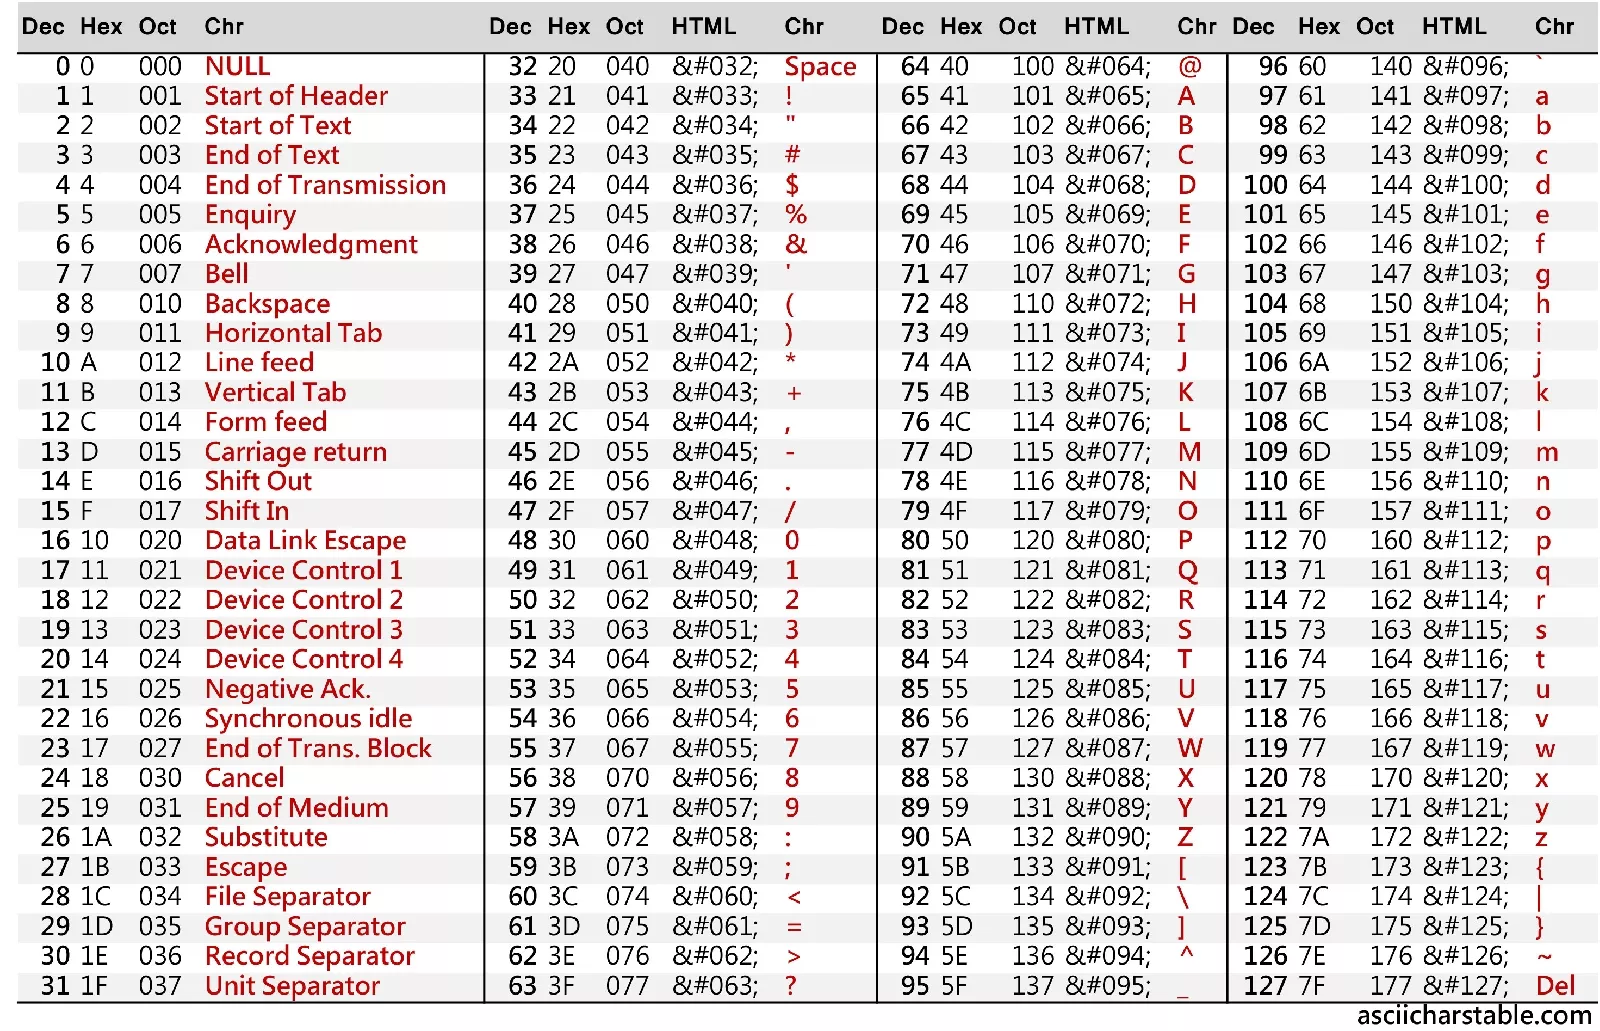
Basically, an ASCII table is a one-to-one mapping of a number to a specific character.
Whenever it appears that we are working with a character, we are actually working with its corresponding number, and the computer neatly treats the number as if it were the character.
Let's say you have a text file with the sentence: Hello world!.
Try to find the representation of this sentence in ASCII using hex numbers:
Hello, world!
The solution is
48 65 6C 6C 6F 2C 20 77 6F 72 6C 64 21
Or - in binary:
01001000 01100101 01101100 01101100 01101111 00101100 00100000 01110111 01101111 01110010 01101100 01100100 00100001
This is the moment where you realize why we usually write things in the hexadecimal representation and not in the binary representation.
The ASCII system was straightforward and nice, but programmers soon realized that English is not the only language in the world. Soon, the limitations of ASCII became apparent. Different languages, with their unique characters and symbols, could not be adequately represented. This limitation led to the development of Unicode, a universal character encoding system.
This is an extremely shortened "history" of Unicode. In reality there were a lot of standards in between. However, nowadays almost everyone uses Unicode, and since this is a book about Linux rather than its history, we will gloss over them.
Unicode
So what is Unicode?
The most important part of Unicode is another one-to-one mapping between characters and numbers.
This is similar to ASCII, except that the character table is giant - version 15.1 defines 149813 (!) characters including constructs like emojis.
Such a number is called a code point.
The entire set of code points is divided into 17 character planes, each consisting of 65,536 code points. These planes are indexed from 0 to 16.
The plane 0 is called the Basic Multilingual Plane (BMP for short) and ranges from U+0000 to U+FFFF.
It contains the most commonly used characters, including most characters from the most common modern languages, punctuation, and many symbols.
Most of the characters that you encounter in everyday text are in the BMP.
Planes 1 to 16 are the supplementary planes and range from U+010000 to U+10FFFF.
They include less commonly used characters, historic languages, various symbols, and emojis.
For example, Plane 1 is the Supplementary Multilingual Plane (SMP for short), which includes ancient languages and emoji characters.
Importantly, a Unicode code point is an abstract number and doesn't directly specify how that number is actually stored in a computer's memory. This job is managed by encodings.
The Unicode standard itself defines three encodings - UTF-8, UTF-16 and UTF-32.
UTF-8
UTF-8 (8-bit Unicode Transformation Format) is a variable-length encoding that can use 1 to 4 bytes for each character. It's designed to be backward compatible with ASCII, which means that the first 128 characters in Unicode (which corresponds to standard ASCII characters) are represented in UTF-8 using exactly the same single byte, making it efficient for English and other Latin-based languages.
Examples:
- Character
A(code pointU+0041): In UTF-8,Ais represented as 41 in hexadecimal, which is the same as its ASCII representation. - Character
€(code pointU+20AC): This character is beyond the ASCII range and is encoded in UTF-8 asE2 82 ACin hexadecimal, using three bytes.
UTF-16
UTF-16 (16-bit Unicode Transformation Format) uses 2 bytes for most characters but extends to 4 bytes for characters outside the Basic Multilingual Plane (more on this in a minute). It is often more efficient than UTF-8 for files that require a large number of non-Latin characters.
Examples:
- Character
A(code pointU+0041): In UTF-16,Ais represented as00 41in hexadecimal, using two bytes. - Character
𐐷(Deseret Capital Letter Ew, code pointU+10437): This character is in a supplementary plane and is encoded in UTF-16 as a surrogate pairD801 DC37in hexadecimal, using four bytes.
In the UTF-16 encoding, characters outside the BMP require a special encoding mechanism known as surrogate pairs. A surrogate pair consists of two 16-bit code units: a high surrogate and a low surrogate.
Surrogate Ranges
- High Surrogates: Range from U+D800 to U+DBFF (1,024 possible values).
- Low Surrogates: Range from U+DC00 to U+DFFF (1,024 possible values).
To encode a character outside the BMP using surrogate pairs, the following steps are taken:
- Subtract 0x10000 from the character's Unicode code point. This aligns the code point to the start of the supplementary planes.
- Represent the result as a 20-bit binary number.
- Split this 20-bit number into two parts: the high 10 bits and the low 10 bits.
- Add the high 10 bits to 0xD800 to get the high surrogate.
- Add the low 10 bits to 0xDC00 to get the low surrogate.
For example, here is how we would encode the '𐐷' character (U+10437):
-
Subtract 0x10000 from U+10437: U+10437 - U+10000 = U+00437
-
Represent U+00437 as a 20-bit binary number: U+00437 in binary is 0000 0100 0011 0111.
-
Split into high and low 10 bits: High 10 bits: 0000 0100 00 (binary) = 0x0040 (hexadecimal) Low 10 bits: 11 0111 (binary) = 0x0037 (hexadecimal)
-
Calculate the high surrogate: 0xD800 + 0x0040 = 0xD840
-
Calculate the low surrogate: 0xDC00 + 0x0037 = 0xDC37
Therefore, the UTF-16 encoding of '𐐷' (U+10437) is the surrogate pair 0xD840 0xDC37.
Try encoding 😊 (U+1F60A) using surrogate pairs (the result should be 0xD83D 0xDE0A).
UTF-32
UTF-32 (32-bit Unicode Transformation Format) is a Unicode encoding that uses a fixed length of four bytes (32 bits) for every character. Unlike UTF-8 and UTF-16, which are variable-length encodings, UTF-32 has the characteristic of using a consistent length for all characters, making it simpler in terms of understanding and handling character encoding.
Let's take the character 'A' (U+0041) as an example:
In UTF-32, 'A' is represented as 00 00 00 41 in hexadecimal. The Unicode code point U+0041 is directly placed in the 32-bit unit, with leading zeros to fill the four bytes.
Another example is the character '😊' (U+1F60A):
In UTF-32, '😊' is represented as 00 01 F6 0A in hexadecimal. The Unicode code point U+1F60A is directly placed in the 32-bit unit, again with leading zeros.
File System
Working with the Command Line
The command line (also called terminal) is an interface where you can type and execute text-based commands. It is a powerful tool and works the same in almost every environment you will ever encounter.
To open the terminal on Ubuntu, press Ctrl + Alt + T.
To open a terminal on Mac you can open the search bar (command + space)
Commands, Options, and Arguments
To execute some action on the terminal, you enter the command, followed by options and arguments, and press Enter/Return:
command -options arguments
- Command - the action you want to perform, it could be anything from moving files, navigating through directories, or downloading files from the internet
- Options - Modifiers that alter the behaviour of the command. Options are usually a single letter preceded by a dash (e.g.
-l). They tweak the command's output and/or behaviour. - Arguments - The target(s) of the command. This could be a file, a directory, a url, and multiple other things, depending on the command's purpose
Options can be short (a single dash with a letter, e.g.
-l) or long (two dashes followed by a word, e.g.--long). You can usually combine multiple short options, for example instead of-l -a, you can write-la.
In the following example, first execute the ls command.
This command is frequently used and displays the content of the directory you are currently in:
ls
Here is how the output of ls might look like:
hello.txt somedir
You can also run this command with options.
For example the option -l allows you to do "long listing", which will include more detailed information about each file and directory.
ls -l
Here is how the output of ls -l might look like:
-rw-rw-r-- 1 someuser someuser   14 Jun  5 12:39 hello.txt
drwxrwxr-x 2 someuser someuser 4096 Jun  5 12:39 somedir
Other options could be -t, which will sort files by modification date, and -a, which will list all files, including hidden ones (those prefixed with a dot, e.g. .config`).
ls -l -t -a
As already mentioned, when passing multiple short flags, you can combine them:
ls -lta
You can also give the ls command a target.
This target can be a directory, which will list the contents of the directory you give as the target instead of the current directory you are in.
Suppose, you have a directory called Downloads - then you can list its contents from any directory by running:
ls -la Downloads
This will work even if you are not currently in Downloads.
Hierarchical Directory Structure
In computing, the hierarchical directory structure is a fundamental concept that organizes files and directories (also known as folders in some operating systems) in a tree-like pattern.
At the very top of this hierarchy is the "root directory" (/).
It is the first directory in the file system, serving as the base or starting point from which all other directories and files come.
In graphical representations, the root directory is often depicted at the top or at the center of the tree.
A directory can hold further files and directories.
Therefore, the root directory contains files and subdirectories, which in turn contain more files and subdirectories, and so on.
You are probably familiar with graphical file managers (if you ever used the native Windows file explorer or finder on MacOS).
However, the command line has no pictures.
At any given time (in the command line), we are inside a single directory (called the current working directory).
From there we can navigate to the directory above us (the parent directory).
To display the current working directory, you can use the pwd (short for print working directory) command.
For example, if you are in /home/someuser, then pwd would output this:
$ pwd
/home/someuser
When we first log in to our system (or start a terminal), our current working directory usually will be our home directory which contains the files for our user (more on this in later chapters).
Change the Current Working Directory
To change our current working directory, we can use the cd command.
To do this you type cd as the command and the path (where you want to go) as the target of the command.
The path is the route we take along the branches of our tree to get to our directory where we want to go. There are two types of path names:
- absolute path names
- relative path names
Absolute Path Names
An absolute path name begins with the root directory and follows the tree branch by branch until the path to the desired directory is completed.
Consider the directory /usr/bin (where most of our systems programs are installed).
This means that the root directory contains a directory called usr and this directory has a directory called bin.
$ cd /usr/bin
$ pwd
/usr/bin
$ ls
... a lot of files...
Relative Path Names
In contrast to absolute path names, which always start from the root directory, relative path names begin from the current working directory. To show that the current pathname should be a relative path, you can use two kinds of special notations:
.- refers to the current working directory..- refers to the parent of the current working directory.
For example, let's change the current working directory to the parent of bin. Using absolute path names, you would do this:
$ cd /usr/bin
$ pwd
/usr/bin
$ cd /usr
$ pwd
/usr
Using relative path names, you would do this:
$ cd /usr/bin
$ cd ..
$ pwd
/usr
If we would like to go back to the bin directory, we could do this like this:
$ pwd
/usr
$ cd ./bin
$ pwd
/usr/bin
Note: You can omit the
./at the beginning (i.e. you can writebininstead of./bin). If we do not specify the/for the root directory, it will be assumed that the path we input is a relative path.
File Names
A few important facts about file names:
File names that begin with a period character are hidden, this means that when using the ls command, they will not be displayed.
To list them you have to use the command with -a argument (ls -a).
Fun fact: This was originally a bug that became a feature at some point.
File names and commands are case-sensitive, meaning that File1 and file1 are two different files.
Linux does not really care about file extensions (unlike e.g. Windows), the content and/or purpose of a file is determined through other means.
Although Linux supports long file names that may contain spaces, you should avoid spaces in file names, and if you want to represent spaces between words inside a file, use underscores or dashes instead.
Basic File Commands
In this chapter, we will explain the most basic commands regarding files. We highly recommend that you open the terminal and follow along by typing the commands into the terminal and looking at their outputs.
Navigating the Filesystem
The pwd command shows your current directory's path.
If you are not sure where you are in the filesystem, type pwd and press Enter.
It will display the full path of your current directory.
The ls command is used to view the contents of a directory (like folders and files).
To see more details about each file, use ls -l.
This command lists files with details like permissions, owner, size, and modification date.
To include hidden files (files that start with a dot) in your listing, use ls -a.
In Linux and Unix-like operating systems, hidden files are those that begin with a dot (.) in their file name. These files are usually not displayed by default when using file managers or the ls command, as they are often used for storing user preferences or system configuration settings.
The cd command is used to move between directories.
For example, to go to the Documents directory, use cd Documents.
To go back to the previous directory, use cd ..
To return to your home directory from anywhere, you can use cd.
To create a new directory, use the mkdir command.
For example, to create a directory named newdir, use mkdir newdir.
The touch command allows you to create a new, empty file.
For instance, to create a file named example.txt, use touch example.txt.
The mv command is used to move files and directories from one location to another or to rename them.
To rename a file, use mv $SOURCE $DESTINATION.
For example, if you want to rename old.txt to new.txt, you can use mv old.txt new.txt.
To move a file to a different directory, use mv $FILE $DIRECTORY.
The cp command is used to copy files and directories.
To copy a file, use cp $FILE $DIRECTORY.
To copy a directory and its contents, use the -r (recursive) flag: cp -r $SOURCE $DESTINATION.
The rm command is used to delete files.
To delete a file, type rm filename.txt and press Enter.
To delete a directory and its contents, use the -r flag: rm -r directory/.
Be extremely cautious with this command, as it permanently deletes files and directories.
In fact, it is often better to avoid
rmaltogether and use something liketrash-put(from thetrash-clipackage) instead. This will simply copy the target to a special "trash" directory, meaning that if you accidentally mistype something, you can still recover it.
The find command is used to search for files and directories based on various criteria.
To find a file by name, type find $PATH -name $NAME.
For example, if you would like to find filename.txt in /home/someuser, you would use:
find /home/someuser -name "filename.txt"
You can also search based on file type, size, modification date, and more.
The grep command is used to search for specific text within files.
To search for a particular word or phrase in a file, use grep $SEARCH_TERM $FILENAME.
For example, if you would like to search for Hello world in the file example.txt, you would do:
grep "Hello world" example.txt
grep can also be used with options for case-insensitive search, searching recursively in directories, displaying line numbers, and more.
The locate command can be used to quickly find the location of files and directories by their names.
To find a file, type locate $FILENAME.
It will display paths of all files and directories with $FILENAME in their names.
The locate command relies on a database that is periodically updated by the system; to update this database manually, you can use the updatedb command.
Now, it is time to practice and do it yourself.
Perform the following instructions by using the commands you just learned. You can check the correctness of the current step by just viewing the contents after doing a command.
- Open the Terminal on your Ubuntu system.
- View the contents of your current directory and then view the detailed information about each item in this directory.
- Navigate to the "Documents" directory from your current location.
- Check which directory you are currently in.
- Create a new directory called "PracticeFolder" inside "Documents."
- Move into the newly created "PracticeFolder."
- Create a new file named "example.txt" in "PracticeFolder."
- List the contents of "PracticeFolder" to verify the creation of "example.txt."
- Create another directory inside "PracticeFolder" called "SubFolder."
- Copy "example.txt" into "SubFolder."
- Rename "example.txt" to "example-renamed.txt" within "PracticeFolder."
- Move "example-renamed.txt" from "PracticeFolder" to "SubFolder."
- Navigate back to the "Documents" directory.
- Search for the file "example-renamed.txt" starting from "Documents."
- Navigate into "PracticeFolder/SubFolder."
- Write some text inside "example-renamed.txt" (you can use a text editor for this).
- Search for a specific word or phrase within "example-renamed.txt" using grep.
- Use locate to find the path of another file on your system (e.g., "example.txt").
- Delete "example-renamed.txt."
- Navigate back to "PracticeFolder" and delete "SubFolder."
- Finally, navigate back to "Documents" and delete "PracticeFolder."
The Benefits of mv, cp and rm
While using a graphical file manager may seem easier for copying a single file, cp and rm shine when you need to copy or remove multiple files at once.
This is where the true power of these commands, combined with globs and wildcards, becomes apparent.
Understanding Globs and Wildcards
Globs and wildcards are patterns that allow you to match file names in a flexible way. For example, the asterisk (*) wildcard matches any number of characters. If you want to copy all PNG images from one directory to another, you could use:
cp *.png /destination/directory/
This command copies all files ending with .png in the current directory to /destination/directory/.
Without the command line, selecting all PNG files for copying could involve manually clicking each file in a GUI file manager.
The -i flag
The -i option stands for "interactive" and changes how cp and mv (move) commands work.
By default, cp and mv will overwrite files without asking.
This can be dangerous if you accidentally overwrite important files.
The -i option prompts you before overwriting, giving you a chance to cancel the operation.
Consider copying a file named report.txt to a directory that already has a file with the same name.
Using cp alone would overwrite the existing file without warning.
With cp -i, you are prompted to confirm the overwrite, reducing the risk of accidental data loss.
cp -i source/report.txt destination/
If report.txt exists in destination/, you will see a prompt like:
overwrite destination/report.txt? (y/n)
The same thing is also true for the mv command.
If you use the mv command and the file exists, then it will be overwritten.
With the -i flag, you will be asked if you want to overwrite it.
The Dangers of rm
The rm command in Unix-like operating systems is a powerful tool for deleting files and directories. However, its power comes with significant risks if used improperly.
Mistakes made with rm can lead to irreversible data loss.
There are safer alternatives, such as trash-cli, which moves files to a trash folder instead of permanently deleting them, providing a safety net for recovery.
A common mistake involves the misuse of wildcards.
Consider an example where you want to delete all HTML files in a directory but accidentally type rm * .html instead of rm *.html.
Suddenly, the rm command will delete all files in the directory (*) and additionally look for a file literally named .html.
Because of the space between * and .html, the command is interpreted as two separate arguments, which can lead to unintended consequences, such as deleting more files than intended.
But it can get even worse.
The -r option tells rm to delete directories and their contents recursively, and -f forces deletion without prompting for confirmation.
Put together, this can be extremely dangerous:
- Running
rm -rf /as root would attempt to delete every file on the system, rendering it unusable. - Even more limited commands, like
rm -rf *in an important directory, can lead to significant data loss.
When you use rm, especially with the -r and/or -f flags should be used extremely carefully.
In contrast to other operating systems, on Linux, you can literally delete anything (including your boot loader or files that are crucial for your OS to work properly).
In general, you should be careful with wildcard usage and if you are new to Linux, use something like trash-cli to avoid deleting data forever.
In fact,
rm -rfis kind of a "meme" in the Linux community (for example, some developers have suggested that you can play "Russian roulette" using a script that generates a random number and then either does nothing or runrm -rf /). You can also read this article for something less funny.
Utility Commands
There are also a few utility commands you should know about.
The command echo <something> just prints the thing after the echo to the console:
$ echo "Hello, world!" # print "Hello, world!"
Hello, world!
The command cat <filename> will output the content of the file with the given name to the console.
Let's say we have a file called example.txt with the content Hello, I am an example.
$ cat example.txt
Hello, I am an example.
You can combine cat with the > operator to write to a file.
For example, if we would like to create a file named example.txt and put the content Hello, world! into it, we would execute the following:
$ touch example.txt
$ echo "Hello, world!" > example.txt
$ cat example.txt # To test if the content is actually in the file
Hello, world!
Symbolic Links
Symbolic links (also called symlinks) are special types of files that act as pointers or references to another file or directory. Unlike a regular file, a symlink does not contain the actual data of the file; instead, it simply contains the path to its target file or directory.
Symbolic links provide an easy way to create shortcuts or references to other files and directories without duplicating the actual content. For instance, in scenarios where multiple applications or scripts require access to the same file or directory, instead of copying the file multiple times, which consumes additional disk space and complicates updates, a symlink can be created.
This symlink points to the original file or directory, ensuring all applications reference the same data. Additionally, symlinks are particularly useful for maintaining compatibility with legacy file paths, as they can redirect old paths to new locations.
There are two types of symlinks - soft links and hard links.
Soft Links
Soft links are pointers to the original file or directory. They are independent files that contain the path of the target file or directory. If the original file is moved or deleted, the soft link becomes a dangling link, pointing to a non-existent location.
Let's create a soft link.
First, let's create the initial file original.txt.
touch original.txt
Now, let's create the symlink:
ln -s original.txt softlink.txt
If you now have a look at the file softlink.txt, you will see that the file is empty.
$ cat softlink.txt
Now, let's add some data into the original.txt, for example, "Hello, world! and display the content of symlink.txt:
$ echo "Hello, world!" > original.txt
$ cat softlink.txt
Hello, world!
You can also edit the symlink file, and you will find that the content of original.txt is updated accordingly.
$ echo "Hello, softlink file!" > softlink.txt
$ cat original.txt
Hello, softlink file!
You can also see where the soft link is pointing to by using readlink -f $FILENAME.
$ readlink -f softlink.txt
/home/user/original.txt
As mentioned previously, if you delete the original file, then the soft link will become invalid.
rm original.txt
ls -la softlink.txt # will still point to original.txt
cat softlink.txt # cat: softlink.txt: No such file or directory
Hard Links
Hard links are direct references to the physical data of the file on the disk. Unlike soft links, they do not contain the path to the original file but share the same inode.
Deleting or moving the original file does not affect the hard link as both the original file and the hard link reference the same data on the disk. Hard links cannot be created for directories.
Now, let's create a hard link:
rm original.txt
touch original.txt
echo "Hello, world!" > original.txt
ln original.txt hardlink.txt
cat hardlink.txt # Hello, world!
As you can see, the same data, which we put into the original.txt, is in the hardlink.txt file.
But in contrast to soft links, if we now delete the original.txt, the content will still be in hardlink.txt.
rm original.txt
cat hardlink.txt # Hello, world!
Link Example
To better understand the use cases of links, let's assume the following situation:
Imagine a scenario where a program needs to use a shared resource, like a file named "foo," which often changes versions. It would be helpful to include the version number in the file name so anyone can easily see which version of "foo" is currently installed.
However, this introduces a challenge. Every time a new version is installed and the file name changes, we would need to update every program that uses this resource to look for the new name. This process is cumbersome and far from fun.
This is where symbolic links come to the rescue. Let's say we install version 2.6 of "foo," giving it the filename "foo-2.6, and then create a symbolic link called "foo" that points to "foo-2.6." Now, when a program opens "foo," it is actually accessing "foo-2.6." This arrangement keeps everyone satisfied. Programs can still locate "foo," and the current version installed is transparent.
When the time comes to upgrade to "foo-2.7," we simply introduce the new file, remove the old symbolic link "foo" and establish a new link to "foo-2.7." This method not only addresses the version update issue but also allows us to keep multiple versions on our system.
If "foo-2.7" turns out to have a bug, reverting to the previous version is as simple as updating the symbolic link to point back to "foo-2.6."
Filesystem Hierarchy Standard
The FHS (Filesystem Hierarchy Standard) consists of a set of requirements and guidelines for file and directory placement under UNIX-like operation systems. They are intended to support the interoperability of applications and greater uniformity of these systems.
Understanding and knowing the base structure of your system is essential for debugging and understanding the next chapters, as most of the concepts that will come later are represented via files. In Linux everything is a file.
Directory Structure
In the FHS all files and directories appear under the root directory /, no matter where
they are actually stored (for example on different physical or virtual devices). We will cover
the most important directories and files, but we recommend to also skip through the actual
FHS Linux docs.
The Root Filesystem
/- this is the primary hierarchy root and the root directory for the whole FHS./bin- this directory holds essential user command binaries that can be used by all users. For example, the binaries for most of the commands that you learned previously are located here (e.g. cat, cp, echo, and many more that you will also learn in the later chapters of this book)./boot- this directory contains the static files for the boot loader. I would really recommend you not deleting this directory/dev- holds special files or device files/etc- contains host-specific system configuration files. Configuration files are local files that are used to control the operation of a program. They have to be static and cannot be an executable binary./home- contains the user home directory, this is where you will be spending most of your time/lib- holds shares library images needed to boot the system and run the commands in the root file system, e.g. by binaries in/binand/sbin/media- contains subdirectories that are used as mount points for removable media devices such as floppy disks and cdroms/mnt- is the mount point for a temporarily mounted file system. The content of this directory is a local issue and should not affect how any program is run. You should not use this directory for installation programs/opt- is reserved for add-on application software packages/root- home directory for the root user. This location is the recommended default location for the root account's home directory and can be determined by the developer/run- this directory contains system information data describing the system since it was booted. Those files must be cleared at the beginning of the boot process/sbin- contains utilities used for system administration, e.g. root-only commands. Commands here are essential for booting, restoring, recovering and/or repairing the system/tmp- contains temporary files which are sometimes needed by files. Programs must not assume that any files in this directory are preserved between the invocations of the program
Now it is time to see for yourself. Navigate to the root directory and show yourself the contents of it (you should be able to already do this yourself).
I give you a moment to do this yourself and I will reveal it now
cd /
ls -la
Now, try to find every directory we previously talked about and explore. Especially inside the
/bin directory, you can search for the binaries we introduced in the previous chapters.
The /usr Hierarchy
The /usrdirectory is the second major section of the filesystem. It is shareable and only contains read-only data.
Large software packages must not use a direct subdirectory under the /usr hierarchy.
/usr/bin- This is the primary directory of executable commands on the system. There must not be any subdirectories in/usr/bin/usr/sbin- contains any non-essential binaries used exclusively by the system administrator.
There are many more subdirectories in the /usr directory, but they are not essential to understand. If you
want to have more information, you can explore it here.
The /var Hierarchy
The /var directory contains variable data files. This includes spool files (files that contain data that is awaiting some
kind of processing, e.g. files that will be printed by a printer later), administrative data, logging data and temporary files.
We will not go through every subdirectory here as the exact subdirectories will be mostly not relevant in the later chapters. If you are interested, you can read about it here.
This section might have seemed dull, but knowing this, or at least understanding where specific files are located, helps you extremely when developing, understanding the concept of the things that come later and helps you debug problems, that you would otherwise never be able to debug.
That said, if you do not know what you are doing, you should NOT edit or remove directories or files located in these directories. It seems pretty obvious, that you should not remove the
/bootor/binor any other directories inside the/directory.
Moreover, you can also only edit those files when being the root user. Are you interested in what the root user is?
Then stay tuned for the next season of Introduction to Linux.
In the next chapter, we will discuss users and groups, which is how unix-like systems manage permissions for different users.
So that not every user, can just delete your /boot directory and kill your whole system.
Users and Groups
In Unix-like systems, the concepts of users and groups are fundamental to the system's security and organization. Users are the entities (people or processes) that interact with the system, while groups are collections of users that share certain permissions and access rights.
Users
Basics
A user is an account representing someone or something that interacts with the system (most of the time it will be you). Each user has a unique identifier called the user id (uid for short).
Every user has their own home directory.
First, let's see which user you are.
With the whoami command, you can see the current user:
$ whoami
someuser
In this case, the current user is someuser.
Different users have different privileges.
The most "privileged" user is usually root - this is similar to the concept of an "admin" user.
If you try to execute a command that needs root privileges and you do not run it with sudo or as a user with root privilege, then you will often get a Permission denied error.
User Management
You can add a new user using the useradd command.
The -m flag will specify the home directory of the new user.
Note that useradd is a privileged command, i.e. this will not work:
$ useradd -m exampleuser
useradd: Permission denied.
useradd: cannot lock /etc/passwd; try again later.
You need to execute this command as the root user or using sudo:
sudo useradd -m exampleuser
We can also password protect the new user, this is done via the passwd command.
sudo passwd exampleuser
You can also change the name of the user:
sudo usermod -l renameduser exampleuser
You will also see that the new user has their own home directory:
$ ls /home/
alex/  exampleuser/
To log in as the new user, you can use the su command:
su - renameduser
To log out, you can just use the exit command.
You can also delete a user (the -r option specifies that the home directory and mail spool of the user should also be deleted):
sudo usermod -r renameduser
We can see all user account and their properties using the passwd command:
sudo passwd -Sa
This lists all of the user accounts and their properties. Most of the users are not really interesting for us, but you will see the presence of the root user and the presence of your user.
You can also get the uid of the user:
$ id someuser
uid=1000(someuser) gid=1000(someuser) groups=1000(someuser),24(cdrom),27(sudo),136(sambashare),999(docker)
Groups
A group is a collection of users. Each group has a unique identifier called the group id (gid for short).
You look up all the groups that a user belongs to. In the following commands, just replace someuser with your actual username which you saw above.
$ groups someuser
someuser sudo cdrom sambashare docker
The exact groups will, of course, vary depending on your machine.
You can also list all groups currently present in the system:
cat /etc/group/
Let's create a new group and add the user to the group
sudo groupadd examplegroup
sudo gpasswd -a alex examplegroup
For these changes to take effect, you need to log out and log in again
You can also rename groups:
$ sudo groupmod -n renamedgroup examplegroup # groupmod -n <new-group-name> <old-group-name>
You can also delete existing groups and remove users from a group:
$ sudo gpasswd -d alex renamedgroup # gpasswd -d <user> <group-name> # remove users from a group
$ sudo groupdel renamedgroup # groupdel <group-name-to-delete> # delete existing groups
There are a lot of specific groups; we covered a few of them above, but you can find a more complete list here
Password Management
The command which you will use for most of the things related to passwords is the passwd command.
To change a user's password you can type:
sudo passwd $USERNAME
You can also lock and unlock accounts (preventing people from logging into them):
sudo passwd -l $USERNAME # lock
sudo passwd -u $USERNAME # unlock
You can also force the user to change the password at the next login:
sudo passwd -e $USERNAME
Now, let's do the following:
- Create a new user
- Change the password of the user to a password of your liking
- Log in as this user
- Log out
- Disable password login to this user
- Try to log in as the user
- Unlock the account
- Log in to the account
- Log out
- Remove the user and the group
Here is the solution:
$ sudo useradd exampleuser # add the user
$ sudo passwd exampleuser # change the password
$ su - exampleuser # login as the example user
$ exit # logout
$ sudo passwd -l exampleuser # lock the user
$ su - exampleuser # login, this will fail
$ sudo passwd -u exampleuser # lock the user
$ su - exampleuser # login as the example user
$ exit # logout
$ sudo userdel -r exampleuser # delete the user
Permissions
Everything is a file.
Most things in Linux will be managed through files: documents, directories, hard drives, CD-ROMs, modems, keyboards, monitors, and more. Therefore, you can manage most of the permissions on a system via managing permissions on files:
Every file on a Linux filesystem is owned by a user and a group, there are three types of access permissions:
- read
- write
- execute
Each file is also owned by a user and a group.
Different access permissions can be applied to the owning user, owning group and others.
We already saw that ls -la prints the permissions:
$ ls -la boot

total 115911
drwxr-xr-x  5 root root     1024 Jan  1  1970  ./
drwxr-xr-x 18 root root     4096 Dec 29 21:25  ../
drwxr-xr-x  6 root root      512 Apr  3  2023  EFI/
drwxr-xr-x  6 root root      512 Apr  3  2023  grub/
-rwxr-xr-x  1 root root 72955758 Jan  4 15:59  initramfs-linux-fallback.img
-rwxr-xr-x  1 root root 32842740 Jan  4 15:59  initramfs-linux.img
-rwxr-xr-x  1 root root 12886816 Jan  4 15:59  vmlinuz-linux
The first column displays the file's permissions (for example, the file initramfs-linux.img has the permissions -rwxr-xr-x).
The third and fourth columns display the file's owning user and group, respectively.
In this example, all files are owned by the user root and the group root.
The first column is split into four parts, the first letter, and three pairs of three letters:
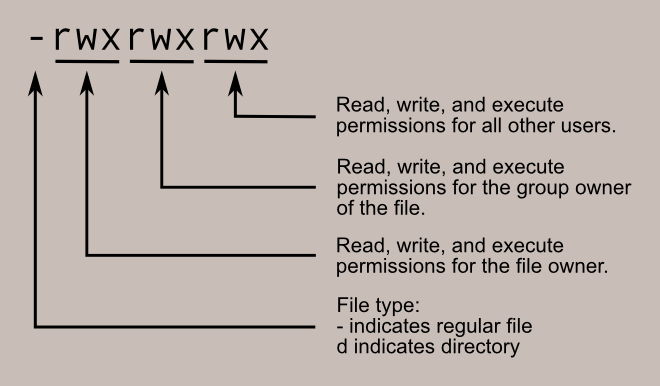
Each part can have up to three letters rwx, where r means read access is enabled, w means that write access is enabled and x means that execute permissions are given.
If there is a - instead it means that this permission is not given.
Consider the following file example:
-rwxr-xr-x 1 root root 1113504 Jun 6 2019 /bin/bash
- The first sign indicates that this is a file and not a directory
- The first part indicates that the root user has read, write and execute permissions
- The second part indicates that the root group has read and execute (no write) permissions
- The third part indicates that all other users have read and execute (no write) permissions
In reality, these are just bits being set or unset, for example:
rwx rwx rwx = 111 111 111 = 7 7 7
rw- rw- rw- = 110 110 110 = 6 6 6
rwx --- --- = 111 000 000 = 7 0 0
Keep this in mind, as when you set permissions, you can give a number to indicate the new permissions. Let's create a file:
$ cd
$ touch permissions.txt
$ ls -la permissions.txt
-rw-r--r-- 1 alex alex 0 Jan 30 08:48 permissions.txt
Let's change the permissions, so every user has rw permissions, but no x (execute) permissions.
The corresponding number would be:
rw- rw- rw- = 110 110 110 = 6 6 6
To change the permissions of a file we can run the chmod <new-permissions> <filename> command:
$ chmod 666 permissions.txt
$ ls -la permissions.txt
-rw-rw-rw- 1 alex alex 0 Jan 30 08:48 permissions.txt
Now, every user can read and write to this file.
Here is how we can remove all permissions for other users:
$ chmod 660 permissions.txt
$ ls -la permissions.txt
-rw-rw---- 1 alex alex 0 Jan 30 08:48 permissions.txt
The same principle applies to directories, although the rwx means slightly different things.
You use this definition if the first bit is d (so it is a directory) instead of -.
- r - allows the contents of the directory to be listed (e.g. via
ls) if the x attribute is also set - w - allows files within the directory to be created, deleted, or renamed if the x attribute is also set
- x - allows a directory to be entered (e.g. cd dir)
Let's create a folder and put a file in there and list the permissions of the folder:
$ mkdir permissions-folder
$ touch permissions-folder/example.txt
$ ls -la permissions-folder

total 8
drwxr-xr-x  2 alex alex 4096 Jan 30 08:56 ./
drwx------ 70 alex alex 4096 Jan 30 08:55 ../
-rw-r--r--  1 alex alex    0 Jan 30 08:56 example.txt
Let's move to the parent directory:
cd ..
Now, let's remove the x permissions from permissions-folder and observe that moving to permissions-folder is no longer possible:
$ chmod 666 permissions-folder
$ cd permissions-folder
cd: Permissions denied: 'permissions-folder/'
If you try to list the content of the directory, you will see the following:
$ ls -la permissions-folder
ls: cannot access 'permissions-folder/example.txt': Permission denied
ls: cannot access 'permissions-folder/.': Permission denied
ls: cannot access 'permissions-folder/..': Permission denied
total 0
d????????? ? ? ? ?            ? ./
d????????? ? ? ? ?            ? ../
-????????? ? ? ? ?            ? example.txt
Processes
What is a Process?
A process is simply an instance of a program that is currently being executed. Basically, think of a process as a program in action.
Consider the following Python script hello.py:
print("Hello, world!")
If you run python hello.py, you will start a process that will print "Hello, world!".
Afterwards, the process will terminate.
You can list the processes on your system using the ps command.
For example, to list all processes you can run:
ps -ef
The -e flag selects all processes and the -f flag tells ps to do "full-format listing".
You can also show an interactive view of processes by executing the top command.
Parents and Children
A process can launch another process. We say that a parent process launches a child process. This is, in fact, the main mechanism by which new processes are created.
The way this works is that after the kernel has booted, an initial process is created. This process spawns new processes, which in turn can spawn new processes etc. Basically, the processes form a giant tree, with the initial process as the root of that tree.
Note that it is possible to have multiple initial processes, in which case you will have multiple process trees.
PIDs
Each process has a PID (process ID) which is a number that uniquely identifies a process.
You can see the PIDs in the output of ps -ef.
Each process also has a PPID (parent process ID) which is simply the PID of its parent.
You can use the -p flag to get information about a process with a specific PID.
For example, here is how you list information about the process with PID 1:
ps -f -p 1
Let's consider an example.
Create the following file parent.py
import os
import subprocess

print(f"Parent PID={os.getpid()}")
print(f"Parent PPID={os.getppid()}")

subprocess.Popen(["python", "child.py"])

input("Press Enter to exit.\n")
Also create the following file child.py in the same directory:
import os
import time

print(f"Child PID={os.getpid()}")
print(f"Child PPID={os.getppid()}")

while True:
    print("Child process running")
    time.sleep(3)
Run python parent.py and observe the following terminal output:
Parent PID=148411
Parent PPID=144069
Press Enter to exit.
Child PID=148469
Child PPID=148411
Child process running
Child process running
Child process running
Child process running
...
Of course, your PIDs and PPIDs will be different.
The parent process (python parent.py) with PID 148411 has created a child process (python child.py).
That child process has a completely new PID 148469, however, its PPID is the ID of the parent process, i.e. 148411.
You can observe this with the ps command:
$ ps -f 148411
UID          PID    PPID  C STIME TTY      STAT   TIME CMD
example   148411  144069  0 19:06 pts/2    S+     0:00 python parent.py

$ ps -f 148469
UID          PID    PPID  C STIME TTY      STAT   TIME CMD
example   148469  148411  0 19:06 pts/2    S+     0:00 python child.py
Process States
A process can be in a state.
The three most important state are running, sleeping and stopped.
A process is running if it's either currently being executed by the CPU or is on a "run queue" (i.e. will be executed as soon as the CPU is available). Basically, processes that are in the running state are actively doing some work or are about to do some work.
A process is sleeping if it's waiting for something to happen (like an event or it's waiting for some time to pass). During this time, a process is not executing any code.
The most common type of sleep is the interruptible sleep which can be interrupted by signals (we will talk about them below). However, there is also the uninterruptible sleep state, which is a special sleep mode where a process cannot be interrupted by a signal.
A process can also be in the stopped state, which is rather self-explanatory. Usually, a process is stopped because it has received a signal. Note that a process that was stopped can be restarted where it left off.
Here is a Python script proc.py that cycles through the states:
import time
import os
import signal

print(f"Process ID: {os.getpid()}")

# Running state
print("State: Running")
k = 0
for i in range(10000):
    for j in range(10000):
        k += i * j

# Sleeping state
print("State: Sleeping")
time.sleep(10)

# Stopped state
print("State: Stopped")
os.kill(os.getpid(), signal.SIGTSTP)
Execute the script by running python proc.py.
The script will print a PID - now run watch proc -f $PID.
While the process is calculating the number k, you will see an R+ in the status column - R is short for "running".
This makes sense because the process is actively using the CPU for number crunching.
When the time.sleep is called, the status column will show an S+ - where S stands for "sleeping".
This also makes sense, because the process is waiting for the timer to complete and is not actively executing any code.
Finally, once the process receives the SIGTSTP signal, the status column will show a T - T is short for "stopped".
There are more states a process can be in (like "zombie"), but these are out of the scope of this book.
Signals
Signals are basically notifications that can be used to tell a process to do something special.
You can send a signal to a process either by invoking the kill command or by using certain keyboard shortcuts on the controlling terminal.
To showcase the effect of different signals, we will use the following proc.py example:
import os
import time

print(os.getpid())

while True:
    print("Running...")
    time.sleep(1)
The SIGINT (signal interrupt) can be sent by the controlling terminal to indicate that a user wants to interrupt the process.
Start the process by running python proc.py and press ^C in the terminal.
This will send a SIGINT to the process.
In the case of Python, a KeyboardInterrupt will be raised and the process will be killed.
However, a SIGINT can also be explicitly handled by the process, resulting in different behaviour. Consider this example:
import os
import signal
import time

print(os.getpid())

def handler(signum, frame):
    print("I received the SIGINT, but I will just keep running...")

signal.signal(signal.SIGINT, handler)

while True:
    print("Running...")
    time.sleep(1)
If you try to press ^C now, the process will just print the message and keep running.
If you press
^Cand a process does not die, it means that it has registered a signal handler. So keep in mind that^Cdoes not actually necessarily kill a process in all cases.
You can also send a SIGINT by executing kill -SIGINT $PID.
The SIGTERM (signal terminate) "politely" tells a process to die for good. This signal can be caught and ignored by the process (hence the "polite").
You can send a SIGTERM by executing kill -SIGTERM $PID.
Just like the SIGINT, a SIGTERM can be caught:
import os
import signal
import time

print(os.getpid())

def handler(signum, frame):
    print("I received the SIGTERM, but I will just keep running...")

signal.signal(signal.SIGTERM, handler)

while True:
    print("Running...")
    time.sleep(1)
The difference between SIGINT and SIGTERM is a bit philosophical. A SIGINT is usually a signal from a user requesting immediate interruption, while SIGTERM is usually a termination request by a system service (or script).
If you are a regular user and you need to interrupt a process, you should send a SIGINT by pressing ^C.
If you write a system script that needs to terminate certain processes, you should send a SIGTERM.
Note that the fact that a process can catch a SIGINT or SIGTERM is not a bug, but a feature. For example, a process might choose to perform some cleanup upon receiving a SIGINT (or SIGTERM), which is often a good idea.
The SIGKILL (signal kill) is the "impolite" version of a SIGTERM. This signal cannot be caught by the process. This means that the process will be terminated immediately (by the operating system).
You should send a SIGKILL as a last resort if the process ignores your more polite requests to die.
You can send a SIGKILL using e.g. kill -SIGKILL $PID.
The SIGHUP (signal hangup) is sent to a process when the controlling terminal is closed.
If you start a process and close the terminal that will send a SIGHUP.
You can also send a SIGHUP using e.g. kill -SIGHUP $PID.
Note that a SIGHUP can be caught:
import os
import signal
import time

print(os.getpid())

def handler(sig, frame):
    with open("hup", "w") as f:
        f.write("I caught the SIGHUP")

signal.signal(signal.SIGHUP, handler)

while True:
    print("Running...")
    time.sleep(1)
If you run python proc.py and then close the controlling terminal, you will see that a new file hup has been created in the same directory as proc.py.
You can "detach" a process from its terminal by telling it to ignore SIGHUP signals using the nohup command.
Consider the following example:
import time
import os

print(os.getpid(), flush=True)

while True:
    print("Running...", flush=True)
    time.sleep(1)
Now run:
nohup python example.py
If you close the controlling terminal, you will see that the process will still be running.
You can confirm that by inspecting the nohup.out file, getting the process ID and executing ps -f -p $PID.
The nohup command is useful for scenarios where you need to start a process in a terminal, but keep it running even if the terminal is closed.
The SIGTSTP (signal terminal stop) "politely" stops a process.
This signal can be caught and ignored by the process (just like SIGTERM).
If you start a process and you press ^Z in the terminal that sends a SIGTSTP.
You can also use e.g. kill -SIGTSTP $PID.
The SIGSTOP (signal stop) is again the "impolite" version of SIGTSTP.
This signal can't be caught by the process (just like SIGKILL).
You can send a SIGSTOP using e.g. kill -SIGSTOP $PID.
You can resume a stopped process using SIGCONT.
You can send a SIGCONT using kill -CONT $PID.
Consider the proc.py example script.
If you run python proc.py and then press ^Z, you will see the following output in the terminal:
[1]+ Stopped python easy.py
Executing ps -f $PID will reveal that the process is still very much alive and kicking, but it is in the stopped (T) state.
You can resume the process by executing kill -SIGCONT $PID.
It will then continue its executing and keep printing "Running...".
Yes, the
killcommand has a very unfortunate and confusing name. It should have been namedsendsignalor something similar.
Foreground and Background Processes
Let's take the following Python script:
import time
import os

print(f"Process ID: {os.getpid()}")

for i in range(30):
    print(f"Running iteration {i}")
    time.sleep(1)
If you simply run the normal command python example.py, this will create a foreground process.
This is a process that is connected to a terminal.
This means that the user can interact with the process (e.g. input some data or send a SIGINT). Foreground processes also take control of the terminal, i.e. you cannot use the terminal for anything else while the process is running.
You can create a background process by adding a & to the end of the command.
For example:
python example.py &
Notice that you can now interact with the terminal normally, but you will still see the output.
You can no longer interact with the process however, for example, pressing ^C will no longer send a SIGINT.
You can execute the jobs command to see the status of background processes that are currently running.
If you do so, you will (among other things) see the following entry:
[1] Running python example.py &
To bring a background process to the foreground, simply run fg %NUM, where NUM is the number of the job.
In the above example the job number was 1, so we would run:
fg %1
You can use foreground processes if you need to interact with the process or your process produces a lot of output and you need to heavily monitor it.
You can use background processes if you need to run tasks that take a long time, don't need to be monitored by you or you want to run multiple tasks at the same time.
If you want to make sure that the controlling terminal no longer has any impact on the process, you can combine the nohup command with background processes:
nohup python proc.py &
You can now do anything you want in your terminal and even close it - the process will just keep running along.
Doing this is the simplest way to start e.g. a long-running web server - just nohup it and send the process to the background.
You can then safely close the terminal - the web server will keep running.
However, for production setups web server usually utilize proper process supervisors like systemd.
The systemd Tool
The systemd tool allows you to manage services.
Consider the following example:
import time

with open("/tmp/example.txt", "w") as f:
    while True:
        f.write("Running...")
        f.flush()
        time.sleep(3)
To manage this script using systemd we need to create a service unit file that will define how to start, stop and manage this script.
Create the following file at /etc/systemd/system/procpy.service:
[Unit]
Description=procpy
After=network.target

[Service]
ExecStart=python /path/to/proc.py
Restart=always
User=exampleuser
Group=examplegroup

[Install]
WantedBy=multi-user.target
Start the service:
sudo systemctl start procpy.service
You can check the status of the service by running:
systemctl status procpy.service
Finally, you can stop the service:
sudo systemctl stop procpy.service
To automatically start a service at boot, you can use the enable command:
sudo systemctl enable procpy.service
To disable the service from starting automatically, you can use the disable command:
sudo systemctl disable procpy.service
If your system is failing to start, you can look at the journalctl logs:
journalctl -u procpy.service
Finally, if you need to change the service file, you will have to run this command before restarting the service:
sudo systemctl daemon-reload
Network Fundamentals
Network Interfaces
Network interfaces are what connect your computer to a network. Network interfaces can correspond to physical objects (like a network interface controller which is the hardware component that allows a computer to connect to a network via a cable or wireless connection). They can also be virtual, i.e. only exist in software.
You can show all your network interfaces using the ip link show command.
On an average Linux machine, this might output something similar to:
1: lo: <LOOPBACK,UP,LOWER_UP> mtu 65536 qdisc noqueue state UNKNOWN mode DEFAULT group default qlen 1000
    link/loopback 00:00:00:00:00:00 brd 00:00:00:00:00:00
2: enp5s0: <NO-CARRIER,BROADCAST,MULTICAST,UP> mtu 1500 qdisc fq_codel state DOWN mode DEFAULT group default qlen 1000
    link/ether 12:34:56:78:9a:bc brd ff:ff:ff:ff:ff:ff
3: wlp4s0: <BROADCAST,MULTICAST,UP,LOWER_UP> mtu 1500 qdisc noqueue state UP mode DORMANT group default qlen 1000
    link/ether 21:32:43:ab:cd:ef brd ff:ff:ff:ff:ff:ff
Here enp5s0 is the interface that will be used for Ethernet connections, while wlp4s0 is the interface that will be used for wireless connections.
Note that enp5s0 is DOWN, while wlp4s0 is UP indicating that the machine is connected to a wireless network and not Ethernet.
The lo interface is an example of a virtual interface called the loopback device.
It's useful if you need services that are running on the same machine to talk to each other.
IP
The Internet Protocol (IP for short) is the basic protocol that allows the delivery of packets from one computer to another. This protocol itself is unreliable, i.e. packets might get corrupted, lost or duplicated. Therefore, you will usually use higher-level protocols like TCP to ensure that this doesn't happen. However, because they build on top of IP, it is still useful to roughly understand what IP does.
The Internet Protocol works by utilizing IP addresses.
Each network interface is assigned a unique IP address which consists of 4 numbers from 0 to 255 separated by dots.
For example, a network interface iface might have the IP address 123.57.81.109.
If you send an IP packet to 123.57.81.109, it will arrive at the network interface iface.
You can find out the IP address of a network interface by using the ip addr show command.
For example, to find out the IP address of wlp4s0, you could do:
ip addr show wlp4s0
This will output something similar to:
3: wlp4s0: <BROADCAST,MULTICAST,UP,LOWER_UP> mtu 1500 qdisc noqueue state UP group default qlen 1000
    link/ether 21:32:43:ab:cd:ef brd ff:ff:ff:ff:ff:ff
    inet 10.37.1.116/24 brd 10.37.1.255 scope global dynamic noprefixroute wlp4s0
       valid_lft 84671sec preferred_lft 84671sec
From this, we can infer that on the given machine, the wireless interface wlp4s0 has the IP address 10.37.1.116.
There are a few IP addresses with special meaning.
For example, the IP address 127.0.0.1 can be used to address the current machine.
A few IP addresses are private addresses, i.e. they can only be used within local networks (and will not be routed on the public internet). These are:
10.0.0.0-10.255.255.255172.16.0.0-172.31.255.255192.168.0.0-192.168.255.255
If you look at the IP address from above, you will realize that this is one of the private addresses. In fact, that will usually be the case, if you are on a regular machine connected to some router. If you have a router, the machines connected to it will be in some local network and have private IP addresses only.
This begs the question - if your machine has a private IP address, and private IP addresses are not routed on the public internet, then why can you browse sites that are part of the public internet?
The answer lies within dark magic called Network Address Translation (NAT for short). A normal router has at least two interfaces - a "private" interface for communicating with machines in the local network and a "public" interface for communicating with machines on the public internet. The "private" interface will have a private IP address and be on the same network as the machines connected to the router. The "public" interface will have a public IP address.
Whenever some machine in the local network tries to send a packet to a machine on the public internet, the router will replace the private IP of the machine with the public IP of the router. When the IP packet arrives at the destination, it will see the IP of the router and send a response to the router. The router will then forward that IP packet to the correct machine on the local network.
You can observe this in practice. Go to any "What is my IP?" website, such as whatismyip.com. You will see the public IP address of your router, not the private IP address of your network interface.
Note that because private IP addresses can only be used in local networks and local networks are isolated from each other, different devices in different networks might have the same private IP address.
Note that we only talked about IPv4. This protocol is currently slowly being superseded by IPv6, however, this is beyond the scope of this book.
TCP and UDP
The Transmission Control Protocol (TCP for short) is a higher-level protocol that builds on top of IP. Unlike IP, TCP is reliable and ensures that packets arrive in the correct order. This makes it ideal for most scenarios where you need to ensure reliability. For example, most websites use TCP under the hood - after all, you do not want to get scrambled or missing content when visiting a website.
TCP is also connection-oriented. This means that a connection must be established between client and server before sending any packets. Additionally, connections will be explicitly terminated.
The User Datagram Protocol (UDP) is another protocol that builds on top of IP. Unlike TCP, it does not provide reliability and is commonly used for applications like video streaming.
TCP and UDP use sockets, which are endpoints for sending and receiving data. Sockets are associated with ports - a port is just a number that can be used to uniquely identify a connection endpoint. For example, HTTPS servers for serving websites typically run on port 443.
Both TCP and UDP function based on a client-server setup.
On the server, we construct a socket that binds to a port, listens for incoming connections and accepts them. On a client, we initiate the connection to a server (using its IP address and port number).
Once a connection is established, data can be sent between the client and the server. Finally, the connection is closed.
Here is an example of a server socket that uses TCP:
import socket

server_socket = socket.socket(socket.AF_INET, socket.SOCK_STREAM)
server_socket.bind(('127.0.0.1', 12345))  # Bind to 127.0.0.1 and port 12345
server_socket.listen(1)  # Listen for 1 connection
print("Server is waiting for connections...")

conn, addr = server_socket.accept()  # Accept a connection
print(f"Connected by {addr}")

while True:
    data = conn.recv(1024)  # Receive data from client
    if not data:
        break
    conn.sendall(data)  # Echo back the received data

conn.close()
Here is an example of a client socket that uses TCP:
import socket

client_socket = socket.socket(socket.AF_INET, socket.SOCK_STREAM)
client_socket.connect(('127.0.0.1', 12345))  # Connect to the server

message = "Hello, server!"
client_socket.sendall(message.encode())  # Send a message

response = client_socket.recv(1024)  # Receive a response
print(f"Received: {response.decode()}")

client_socket.close()
HTTP
HTTP Basics
HTTP builds on top of TCP.
HTTP is a server-client protocol. A client (for example a web browser) communicates with a server (for example some Python service).
HTTP is a request-response protocol, i.e. HTTP clients send requests to an HTTP server and receive a response in return. Requests are pretty much always sent by the HTTP client.
HTTP knows many different request methods, the two most common of which are GET and POST. GET requests are generally used to retrieve data. POST requests are generally used to send information to the server that tells it to update some information.
For example, let's use curl to retrieve https://example.com:
curl --trace-ascii example.txt http://example.com
Looking at example.txt, we will see:
GET / HTTP/1.1
Host: example.com
User-Agent: curl/7.81.0
Accept: */*
The request contains:
-
The HTTP method that defines the operation the client wants to perform.
-
The path of the resource to fetch (
/in this case). Note that the path is "relative" to the origin. -
The version of the HTTP protocol (
HTTP/1.1in this case).
This is followed by optional headers.
For example, in this case, we inform the server that our User-Agent is curl/7.81.0.
The response:
HTTP/1.1 200 OK
Accept-Ranges: bytes
Age: 343881
Cache-Control: max-age=604800
Content-Type: text/html; charset=UTF-8
Date: Sun, 03 Mar 2024 09:05:25 GMT
Etag: "3147526947"
Expires: Sun, 10 Mar 2024 09:05:25 GMT
Last-Modified: Thu, 17 Oct 2019 07:18:26 GMT
Server: ECS (nyd/D146)
Vary: Accept-Encoding
X-Cache: HIT
Content-Length: 1256

<!doctype html>
...
</html>
This contains the protocol version, the status code, the status text. This is followed by the headers. This is followed by the data.
Status codes
Headers
The most important request headers are the following.
The Host header specifies the host (and optionally port) of the server to which the request is being sent.
This header is mandatory.
The User-Agent header is a string that tells servers information about the client.
This could include the application, operating system, vendor and version of the client.
For example:
Mozilla/5.0 (X11; Ubuntu; Linux x86_64; rv:123.0) Gecko/20100101 Firefox/123.0
The Accept header describes which content types (MIME types) a client can understand:
text/html,application/xhtml+xml,application/xml;q=0.9,image/avif,image/webp,*/*;q=0.8
The Accept-Language header specifies the natural language that the client prefers:
en-US,en;q=0.5
The Content-Type header indicates the type of the request body (usually used with POST requests).
The most important response headers are the following.
The Content-Type header specifies the media type of the response content.
For example if the server sends back an HTML, this would be the Content-Type:
text/html; charset=UTF-8
The Content-Length indicates the size of the message body in bytes.
Cookies
Cookies are data that a server can send to a web browser. The web browser can store the cookie and send it back to the server with later requests.
Cookies are useful for remembering information between requests. There are three primary functions:
- session management
- personalization
- tracking
Note that cookies should not be used for general storage (local storage and session storage should be used instead).
Here is the Flask app:
from flask import Flask, request, make_response, render_template_string

app = Flask(__name__)

html_content = """
<!DOCTYPE html>
<html>
<head>
    <title>Cookie Test</title>
</head>
<body>
    <button id="setCookieBtn">Set Cookie</button>
    <button id="getCookieBtn">Get Cookie</button>
    <script>
        document.getElementById('setCookieBtn').onclick = function() {
            fetch('/set-cookie')
                .then(response => response.text())
                .then(data => console.log(data));
        };

        document.getElementById('getCookieBtn').onclick = function() {
            fetch('/get-cookie')
                .then(response => response.text())
                .then(data => console.log(data));
        };
    </script>
</body>
</html>
"""

@app.route('/')
def home():
    return render_template_string(html_content)

@app.route('/set-cookie')
def set_cookie():
    resp = make_response("Cookie is set")
    resp.set_cookie('example_cookie', 'Example')
    return resp

@app.route('/get-cookie')
def get_cookie():
    cookie_value = request.cookies.get('example_cookie', 'Cookie not found')
    return f'Cookie value: {cookie_value}'

if __name__ == '__main__':
    app.run(debug=True)
If you click the Set Cookie button, you will see the following response header:
Set-Cookie: example_cookie=Example; Path=/
If you click the Get Cookie button, you will see the following request header:
example_cookie=Example
Redirects
HTTP Redirects allow you to redirect a client to another page.
Redirects have a 3xx status code and a Location response header indicating the URL to redirect to.
HTTPS
HTTPS adds encryption on top of HTTP.
Before any traffic is sent, an SSL/TLS handshake is performed. The client generates a private key and a public key. The server also generates a private key and a public key.
The private keys are kept secret, the public keys are exchanged. The client and server both compute a shared key. The server computes the shared key from the private key of the server and the public key of the client. The client computes the shared key from the private key of the client and the public key of the server. Because of the way public-key cryptography works, the two computed values will be the same.
The full details are complex and beyond the scope of this book. Additionally, in modern TLS versions the client and the server generate ephemeral (temporary) keys specific to each session.
However, we still have a problem due to so-called "man-in-the-middle" attacks.
A malicious entity could pretend to be e.g. google.com and present us his public key.
Therefore, we need a way to validate that a public key indeed belongs to a certain domain.
An SSL certificate does just that. It contains the public key and the domain name. It is signed by some entity that our browser trusts. Note that there might be intermediate certificates leading to a chain of trust.
Package Management
Basics
A package manager is a program that automates the process of - well - managing packages. This includes installing, upgrading and removing packages as well as other operations.
The Advanced Package Tool
Repositories
The most used package manager for Ubuntu/Debian is the Advanced Package Tool (apt for short).
APT relies on repositories to find software and resolve dependencies.
These repositories are mostly contained in the file /etc/apt/sources.list.
Additional repositories are often listed in the /etc/apt/sources.list.d directory.
This is how an /etc/apt/sources.list file might look like:
$ cat /etc/apt/sources.list
deb http://de.archive.ubuntu.com/ubuntu/ jammy main restricted

## Major bug fix updates produced after the final release of the distribution.
deb http://de.archive.ubuntu.com/ubuntu/ jammy-updates main restricted

## N.B. software from this repository is ENTIRELY UNSUPPORTED by the Ubuntu team.
## Also, please note that software in universe WILL NOT receive any review or updates from the Ubuntu security team.
deb http://de.archive.ubuntu.com/ubuntu/ jammy universe
deb http://de.archive.ubuntu.com/ubuntu/ jammy-updates universe

## N.B. software from this repository is ENTIRELY UNSUPPORTED by the Ubuntu team, and may not be under a free license.
## Please satisfy yourself as to your rights to use the software.
## Also, please note that software in multiverse WILL NOT receive any review or updates from the Ubuntu security team.
deb http://de.archive.ubuntu.com/ubuntu/ jammy multiverse
deb http://de.archive.ubuntu.com/ubuntu/ jammy-updates multiverse

## N.B. software from this repository may not have been tested as extensively as that contained in the main release,
## although it includes newer versions of some applications which may provide useful features.
## Also, please note that software in backports WILL NOT receive any review or updates from the Ubuntu security team.
deb http://de.archive.ubuntu.com/ubuntu/ jammy-backports main restricted universe multiverse

deb http://security.ubuntu.com/ubuntu jammy-security main restricted
deb http://security.ubuntu.com/ubuntu jammy-security universe
deb http://security.ubuntu.com/ubuntu jammy-security multiverse
Each line consists of these parts:
The deb indicates a binary repository (as opposed to deb-src which indicates a source repository).
This is followed by the URL of the repository.
This is followed by the codename for the Ubuntu release (which is jammy, i.e. Ubuntu version 22.04).
The last parts indicate the section of the repository, where:
mainis officially supported softwarerestrictedis supported software that is not available under a completely free licenseuniverseis community-maintained software (open-source but not officially supported)multiverseis non-free software
Additionally, you might have lists in sources.list.d.
For example, when you install Docker, you will usually create a file /etc/apt/sources.list.d/docker.list containing the following content:
deb [arch=amd64 signed-by=/etc/apt/keyrings/docker.gpg] https://download.docker.com/linux/ubuntu jammy stable
Updating
You can run the following command to fetch available packages from the locations specified in /etc/apt/sources.list and /etc/apt/sources.list.d:
sudo apt update
During the update, you will see that the command hits the repositories one by one and performs the update.
Note that this does not actually upgrade or change any packages - it merely retrieves the newest information about these packages.
Upgrading
You can use the upgrade command to actually install new versions of packages:
sudo apt upgrade
Note that you should always run apt update before apt upgrade so that your machine is aware of the newest package versions.
The sudo apt update followed by a sudo apt upgrade is something you should regularly execute to get the newest package versions.
A slightly different way to upgrade is to use the full-upgrade command:
sudo apt full-upgrade
This will intelligently handle changing dependencies with new package versions. Basically, APT has a "smart" conflict resolution system and will attempt to upgrade the most important packages at the expense of less important ones. It might even remove installed packages if that is required in order to resolve a package conflict.
Installation
You can install a package like this:
sudo apt install $PACKAGE_NAME
For example, if you want to install the package trash-cli (which contains the trash-put tool), you would run:
sudo apt install trash-cli
Removing Packages
To remove a package, you use:
sudo apt remove $PACKAGE_NAME
Note that removing a package will leave its configuration files on the system. If you want to delete configuration files in addition to removing a package, you can purge it:
sudo apt purge $PACKAGE_NAME
Searching for Packages
You can use apt search $KEYWORD to search for packages and apt show $PACKAGE_NAME to display package information.
Managing PPAs
Personal Package Archives (PPA) allow you to upload Ubuntu source packages to be built and published as an apt repository by Launchpad. They basically provide a way for individual developers to distribute software to users in an easy way.
You can add a PPA like this:
sudo add-apt-repository ppa:$PPA_NAME
sudo update
You can then install packages from PPA by simply running the apt install command.
You can remove a PPA like this:
sudo add-apt-repository --remove ppa:$PPA_NAME
The dpkg Tool
The dpkg tool is the backend of apt and does the low-level operations.
You can install a package like this:
sudo dpkg -i $PACKAGE_NAME.deb
You can remove a package like this:
sudo dpkg -r $PACKAGE_NAME.deb
You can purge a package like this:
sudo dpkg --purge $PACKAGE_NAME.deb
You can list installed packages like this:
dpkg -i
Basic Shell Scripting
Hello, World
So far we only executed straightforward commands in the terminal. This is enough for simple cases, but not for more intricate scenarios.
For example, we might want to execute a sequence of commands after each other, chain commands together, repeat commands or maybe even execute commands conditionally.
We can achieve this by writing shell scripts. These are similar to scripts written in other programming languages (like Python or JavaScript). You write a bunch of code, which you can then execute to accomplish some task.
To see how this works, let's create a very simple example script example.sh with the following content:
echo "Hello, world!"
We can execute that example script by running:
sh test.sh
This will output Hello, world! to the terminal.
Note that the word "shell" is used both to describe the terminal as well as a programming language that can be used to write a shell script.
Choosing Your Flavour
There are many different shells available for Linux - sh, bash, ksh, csh and fish are just a few examples.
We will primarily focus on sh and bash.
The sh shell is an older shell whose features later became standardized in the so-called POSIX standard.
The bash shell is a newer shell that implements all features of sh and has some additional functionality on top of that.
We will primarily talk about the POSIX-compliant parts of bash.
If some bash feature is not POSIX-compliant, we will explicitly mention it.
Since there are many different shells, it is often a good practice to add a shebang on top of your shell to specify how your script should be executed.
For example, if we want to execute our script with sh we would specify the location of sh as the shebang:
#!/bin/sh

echo "Hello, world!"
Alternatively, we could specify that our script should be executed with bash like this:
#!/bin/bash

echo "Hello, world!"
Shebangs are a good idea because often scripts are executed not via sh or bash but by marking them as executable and then simply specifying the path:
chmod u+x example.sh
./example.sh
The shebang will make sure that the script will be executed by the correct interpreter.
Variables
Variables are declared using the variable=value notation.
You can then use the variable by prefixing it with the $ character.
Unlike most other programming languages, sh doesn't really have the concept of a data type.
All variables are strings, but, depending on the context, you can do arithmetic operations and comparisons.
Basically, if a variable contains only digits, it can be treated as a number.
Consider this example script:
#!/bin/bash

# You can assign a string to a variable.
# If the string contains no whitespaces, you don't need
# to put it in quotes, although it's usually recommended to do so.
short_username=John
echo $short_username

short_username_2="John"
echo $short_username_2

long_username="John Doe"
echo $long_username

# The number variable is still a string, but you can do numeric operations on it,
# as we will see later
number=1
echo $number
This will output the following:
John
John
John Doe
1
You can use variables inside strings like this:
# You can use a variable in a string if you prefix it with $
echo "Hello, $short_username"

# You can also surround the variable with curly braces
# in ambiguous expressions
echo "Hello, ${short_username}1"
This will output the following:
Hello, John
Hello, John1
An extremely common error that beginners make is adding spaces in assignments:
username = "John"
This doesn't work and will result in an error:
./example.sh: line 1: username: command not found
It's important to understand that the shell is extremely permissive. All variables that don't exist at the time of usage will be automatically created.
This can lead to problems. For example, if you mistype a variable, you won't get an error. Instead, the shell will silently create a new variable:
#!/bin/bash

username="John Doe"

# This will output an empty string
echo $usernam
Command Substitution
You can use the output of a command in your script via the command substitution mechanism.
The syntax for this is $(command).
For example, here is how you can store the output of ls in a variable ls_output:
ls_output=$(ls)
echo $ls_output
Arithmetic
The shell supports the usual arithmetic operators +, -, *, /, % (modulo) and ** (exponentiation).
You can perform arithmetic expansion using the $((expression)) notation:
echo $((5 + 2)) # 7
echo $((5 - 2)) # 3
echo $((5 * 2)) # 10
echo $((5 / 2)) # 2
echo $((5 % 2)) # 1
echo $((5 ** 2)) # 25
Note that division is truncated to integers and arithmetic expansion only supports integers.
For example, trying to do this will result in a syntax error:
echo $((5.2))
Functions
Just like most other programming languages, sh supports functions.
However, you should not think about shell functions the same way you would think about e.g. Python or JavaScript functions.
Instead, you should think of shell functions as a kind of "mini-scripts" (or "mini-commands").
This is also why sh functions have a peculiar syntax for passing arguments or returning values.
You can define a function like this:
function_name() {
    # commands
}
You can call the function by simply writing function_name (just like you would call a regular command).
For example:
greet() {
    echo "Hello, world!"
}

greet
This will output Hello, world!.
You can also define a function like this:
function greet {
    echo "Hello, world!"

greet
}
This is a
bashextension and not POSIX-compliant.
If you need to pass parameters to a function, you don't write greet(arg1, arg2).
Instead, arguments passed to a function can be accessed using $1, $2 etc:
greet() {
    echo "Hello, $1!"
}

greet "World"
This will output Hello, world!.
Here is an example with multiple parameters:
add() {
    sum=$(($1 + $2 + $3))
    echo "Sum is: $sum"
}

# Call the function with 5, 10 and 15 as arguments
add 5 10 15
If you want to return a value from a function, you can echo it and then capture the output via command substitution:
greet() {
    echo "Hello, world!"
}

greeting=$(greet)
echo $greeting
Note that there is also the
returnkeyword which allows you to exit a function with a status code.
An important point with bash and most other sh dialects is that variables are global by default, even if they're created in a function body:
#!/bin/bash

fun() {
    # Create a variable in the function body
	x=42
    # This will output 42
    echo "In body: $x"
}

# Call the function
fun

# This will also output 42
echo "Outside body: $x"
If you want to create a local variable in bash, you need to explicitly use the local keyword:
#!/bin/bash

fun() {
    # Create a variable in the function body
	local x=42
    echo "In body: $x"
}

# Call the function
fun

# Here $x will be an empty string
echo "Outside body: $x"
Conditionals
You can use the if, elif and else keywords for conditional behaviour:
if [ condition1 ]; then
    # commands for condition1
elif [ condition2 ]; then
    # commands for condition2
else
    # commands if neither condition1 nor condition2 is true
fi
Make sure that there is a space after [ and a space before ].
The conditions must be expressions that evaluate to true or false.
Here, you can use comparison operators like -eq, -ne, -lt, -le, -gt and -ge for numeric comparisons.
For example:
age=14

if [ $age -lt 17 ]; then
	echo "No drinks for you!"
elif [ $age -eq 17 ]; then
	echo "So close!"
else
	echo "Have fun!"
fi
You can also use the operators =, != for equality comparisons.
For example:
number="one"

if [ $number = "one" ]; then
    echo "We are number one!"
elif [ $number = "two" ]; then
    echo "We are number two!"
else
    echo ":("
fi
You can also use the -a (and), -o (or) and the ! (not) operators to combine conditions.
For example:
#!/bin/bash

user="admin"
logged_in="true"

if [ $user = "admin" -a $logged_in = "true" ]; then
    echo "Welcome, admin!"
fi
Bash introduces additional syntax that looks more like conditionals in other programming languages.
You can write [[ ]] instead of [ ] to allow for operators like && (and), || (or) and == (similar to = with additional pattern matching features).
For instance, the previous example could be written like this in Bash:
#!/bin/bash

user="admin"
logged_in="true"

if [[ $user == "admin" && $logged_in == "true" ]]; then
    echo "Welcome, admin!"
fi
This syntax looks much more similar to other programming languages.
Loops
The shell supports most familiar loops like while and for.
A while loop constantly checks whether a condition is met.
If the condition isn't met, the while loop terminates.
The general syntax for a while loop looks like this:
while [ condition ]; do
    # commands to execute
done
For example:
count=1
while [ $count -le 5 ]; do
    echo $count
    count=$((count + 1))
done
A shell-specific loop is the until loop which is a kind of the opposite of the while loop.
A while loop continues until a condition is no longer true.
The until loop continues until a condition is true.
Here is how we could rewrite the example using an until loop:
count=1
until [ $count -gt 5 ]; do
    echo $count
    count=$((count + 1))
done
The general syntax for a for loop looks like this:
for item in list; do
    # commands to execute
done
For example:
for i in 1 2 3; do
    echo $i
done
Here is how you could use a for loop to iterate over the current files in a directory:
for file in $(ls); do
    echo "$file"
done
You could also iterate over the lines in a file:
for word in $(cat filename); do
    echo "$word"
done
You can use the break keyword to exit from a loop:
#!/bin/bash

count=1
while [ $count -le 5 ]; do
    echo $count
    if [ $count -eq 3 ]; then
        break # Exit the loop when count equals 3
    fi
    count=$((count + 1))
done
You can use the continue keyword to skip the rest of the current loop iteration and continue with the next iteration:
#!/bin/bash

count=0
while [ $count -lt 5 ]; do
    echo $count
    if [ $count -eq 3 ]; then
        continue # Skip the rest of the loop when count equals 3
    fi
    count=$((count + 1))
done
Stdin, Stdout and Stderr
In Linux, the standard way programs communicate with their environment is through the three data streams called stdin (short for standard input), stdout (short for standard output) and stderr (short for standard error).
Specifically, they send results to stdout and errors to stderr, while reading input from stdin.
Internally, these streams are referenced by the file descriptor numbers 0 (stdin), 1 (stdout), 2 (stderr).
For example, when your program "writes something to the console", it actually sends data to stdout:
echo "This is sent to stdout"
When your program "reads user input", it actually reads input from stdin:
read -p "Read a value from stdin: " input
echo $input
You can use I/O redirection to redirect a stream by using the >, >> and < operators.
For example, you can redirect stdout to a file like this:
echo "This will be written to example.txt" > example.txt
The difference between > and >> is that > will overwrite the file, while >> will append to the file.
Consider this example:
echo -n "This first line will be overwritten" > example.txt
echo "Second line" > example.txt
The resulting file will look like this:
Second line
Now consider this example:
echo "This first line will not be overwritten" >> example.txt
echo "Second line" >> example.txt
The resulting file will look like this:
This first line will not be overwritten
Second line
We can also use > to redirect stdout to stderr via the 1>&2 notation.
For example, here is how we can write something to stderr:
echo "This will be written to stderr" 1>&2
We can also use > to redirect stderr to stdout via the 2>&1 notation.
This is usually useful in cases where you want to redirect both stdout and stderr to a file using > filename 2>&1.
Note that the order of the redirects is important here:
First, we redirect stdout to filename.
Second, we redirect stderr to stdout.
Since stdout is redirected to filename, stderr will also be redirected to filename.
We can also use the
>operator to create the world's simplest text editor by runningcat > output.
We can use the < operator to redirect stdin.
Consider this script that reads a line from a user and outputs it back:
read -p "Enter a line:" line
echo $line
If you want to read that line from a file instead, you can create a new file containing the line and then use < to redirect stdin from the file:
sh example.sh < example.txt
Pipe Operator
The pipe operator | can be used to pipe stdout of one command to stdin of another command.
Consider the following two scripts.
The first script generate.sh generates numbers from 1 to 5 and writes them to stdout:
seq 1 5
Now, consider a second script square.sh that reads numbers from stdin and prints their squares:
while read number; do
  echo $((number * number))
done
You can use the | operator to pass the output of generate.sh to square.sh:
./generate.sh | ./square.sh
This will output:
1
4
9
16
25
Environment Variables
Environment variables are special variables that are defined outside your script. They are part of the environment in which the script runs. These variables contain information related to the system or user environment.
For example, the USER environment variable contains the current user and HOME the home directory of the current user:
echo $USER
echo $HOME
The SHELL environment variable contains the path to the current shell:
# Outputs /bin/bash if you're using bash
echo $SHELL
One particularly important environment variable is the $PATH variable.
This specifies the directories that the shell traverses when looking for executable files when you enter a command.
The directories are separated by colons.
For example, $PATH might be /bin:/usr/bin:/home/username/.local/bin.
In this case, the shell would look for files in /bin, /usr/bin and /home/username/.local/bin.
This means that if you have file /usr/bin/thingy and you type thingy in your command line, the shell will be able to locate and execute that file.
You can also set your own environment variables temporarily using the export command:
export VAR_NAME=varvalue
The variable will be set for the duration of the session (e.g. if you close the terminal, it will be lost).
Your scripts will be able to access the variable VAR_NAME.
You can use printenv to print the currently set environment variables.
Should you use bash?
Since bash is theoretically not POSIX-compliant, there a some people who advocate against using bash (at least the non-compliant features).
However, these days bash is available on practically any useful Linux distribution.
In our opinion, you should absolutely use bash (including the non-compliant features) unless you really have to support some ancient Linux distribution.